Device Registration
Device Profile
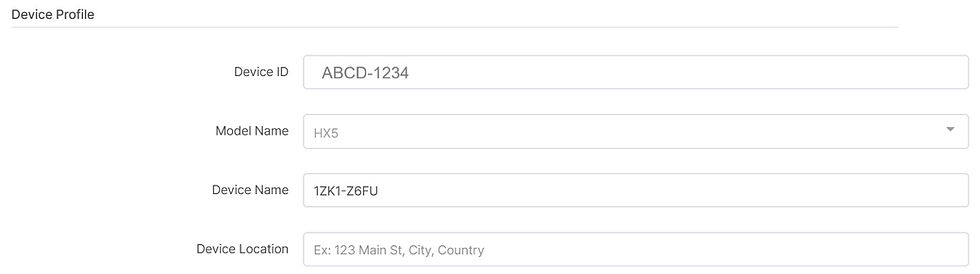
To register a new device, click ➊ New Device button in the top-right corner. Enter the ➋ Device ID displayed on the ➌ device startup screen (for example, ABCD-1234) into the ➍ Device ID field in the Device Profile.

➊

➋
➌
➍
-
Once Device ID is entered, the system will automatically detect Model name.
-
Enter a descriptive name for the device in the Name field.
-
In Device Location field, begin typing the city or location name; select the precise location from the Google-powered dropdown list.
Display Settings

Screen Orientation: Select the orientation that matches your installation: Landscape, Portrait, Landscape 180°, or Portrait 180°.
Video Wall Layout: Select a layout that matches your video wall configuration. (e.g., 1x1, 1x3, 2x1, 3x1, 2x2).
Bezel Correction: The physical bezel of the monitor can cause visual gaps when configuring a multi-display setup. Bezel correction minimizes this visual disconnection, allowing content to flow naturally as if it were on a single screen. When applied, the image appears to seamlessly extend behind the bezels.
-
Display Area Size: Enter the width and height of the display area in mm. (Measure only the actual outer frame, excluding the screen area, to determine the bezel dimensions.)
-
Bezel Width: Enter the width of the top, bottom, left, and right bezels.
-
Apply: Click the Save button to apply your settings.
.jpg)

⚠️Important: Regardless of the monitor's actual installation orientation (portrait/landscape), all bezel correction settings must be entered based on the monitor's landscape mode orientation.
Operating Hours Settings
This feature allows you to define screen operating hours for each day of the week. By using this function, you can prevent the screen from being turned on during non-operating hours, thereby increasing energy efficiency.
When you select ➎ Enable Operating Hours Checkbox, the detailed operating hours setting screen will be activated as shown below.


➏
➎
Daily Time Settings
-
Checkbox Selection: Select (check) the days you wish to configure.
-
Time Entry: Set the 'Start Time' and 'End Time' in the input fields next to the selected day.
-
Example: If Monday is checked and set to 09:00 AM – 06:00 PM, the screen will turn on during these hours.
-
-
Automatic Power-Saving (Display OFF): During unconfigured days or outside of the set time periods, the screen will automatically remain in a 'Display OFF' state.
-
Copy Settings (Copy Icon):
-
Efficiency: If you want to apply the settings of one day (e.g., 09:00 AM – 06:00 PM on Monday) to other days, you do not need to enter them manually for each day.
-
How to use: Click Copy icon located to the right of the day to instantly copy and apply the saved settings to another day.
-
Exception Operating Hours Settings: If you need to operate the screen outside of your regular operating hours—such as during public holidays or special events—click ➏ Add Exception Operating Hours button at the bottom to create an exception schedule.
📌Note: Operating Hours and Schedule Priority
To ensure efficient operation, please note the following priority rules:
-
Operating Hours take priority: Operating Hours define the master timeframe during which the screen is allowed to be ON. Schedule acts as a tool to manage content within that timeframe.
-
Schedule works only within Operating Hours: Any Display OFF or content playback settings in your schedule will only be effective if they fall within the defined Operating Hours.
-
Automatic Shutdown: Once the Operating Hours end, the screen will remain in Display OFF mode, even if a schedule for content playback is set for that time.
Camera Settings
Connect USB or IP cameras to enable real-time monitoring and Audience Analysis.

Camera settings are only available when a camera is connected to the device via USB, HD-IN port (HX5 model only), or IP network.
-
Not used: No camera is detected.
-
USB Camera: Select this option when a USB camera is connected to the device's USB port.
-
ONVIF Profile S: Applicable to IP camera models supporting ONVIF Profile S. ONVIF Profile S is a standard protocol for IP camera communication.
-
IP Address: Enter the unique IP address of the camera connected to the network.
-
User ID: Enter the account ID for authentication to access the camera.
-
Password: Enter the authentication password to access the camera.
-
-
Mirror Image: Selecting the checkbox horizontally flips the camera input image as if reflected in a mirror.

📌Note: The HD-IN port selection feature is currently disabled. For additional information, please contact your reseller or system administrator.

➑
➐
-
Audience Analysis:
-
Select the checkbox to enable ➐ Audience Analysis using a camera connected to the device. This helps measure audience engagement, visitor traffic, and campaign effectiveness.
-
Colltected data can be analyzed from various perpectives, such as metrics, time, and day of the week, which can be utilized to establish efficient store management strategies.
-
The system detects faces via the camera and categorizes data by estimating gender (male/female) and approximate age group.
-
Privacy and Security:
-
This system uses only Face detection technology, which does not perform personal identification, and collects only anonymized demographic data such as estimated age group and gender.
-
All data is processed in real-time on the local device, and no original images or facial data are stored.
-
The system strictly complies with international privacy regulations, including GDPR and SOC II security standards.
-
-
Audience Analysis Data: Please refer to the Device Management section.
-

-
Show Face Detection Box
-
Functionality: When ➑ Face Detection Box is checked, the system displays a green box around detected faces and shows the estimated gender and age group in real-time.
-
Purpose: This feature is an ‘installation optimization tool’ designed to ensure the accuracy of audience analysis. By observing these boxes, you can verify if the camera is detecting subjects correctly and adjust the camera's position and angle to achieve optimal detection performance.
-
Usage Guide: Adjust the camera position while monitoring the green boxes. Stable detection indicates an ideal setup, which will significantly improve the reliability of your audience analysis data.
-
📌Note: This analysis feature is optimized for real-time detection rather than absolute precision, and typically achieves a detection accuracy of over 80%.


Products
Use Cases