Playlist Creation
A Playlist is a playback list that organizes content to be displayed on screens. Beyond a simple list of files, users can freely add media and adjust the sequence to create optimal playback scenarios. Additionally, by viewing and managing the playback list in real-time on the playlist page, efficient content operation is made possible.
Playlist Editor
To create a new playlist, click the ➊ New Playlist button at the top right. You will be redirected to the Playlist Editor.
➊
.jpg)
The main components of Playlist Editor screen are as follows:
➋ Name: A field to enter the name of the playlist. A default name including the creation date and time is automatically set.
➌ Transition Effect: Selects the animation effect to be applied when transitioning between images.
➍ Add Interactive Event: Adds interactive events to the playlist that are triggered by specific actions.
➎ Playlist Timeline: A workspace for managing content included in the playlist. You can add content by dragging it from the Media Library below or selecting it for placement.
➏ Media Library: A space for viewing and selecting all media files uploaded to the system.

➏
➎
➍
➌
➋
➊ Set Image Transition Effects
Transition effects are visual enhancements applied when moving from one image to another within a playlist. Beyond simple image replacement, they help smooth the flow of the screen and enhance viewer engagement, allowing for the creation of more professional and dynamic content.
Select Transition Effect: Choose an animation to apply when
transitioning between images.
-
Scale: The image zooms in or out.
-
Fade: The image gradually appears or disappears.
-
Flip: The image flips over.
-
Jack-in-the-box: The image pops up into the screen.

➊
Add Media to a Playlist
-
Adding Media: Click ➊ Select on Media Card in Library Panel, or ➋ drag and drop the card directly into the playlist window.
-
➌ Change Playback Order: Drag and drop Media Card within the playlist to rearrange the playback order.
-
➍ Adjust Playback Duration: Use Up and Down Arrow buttons below Media Card to adjust the playback duration.
📌Note: The duration for video files is fixed and cannot be adjusted.
-
➎ Check Total Duration & ➏ Preview: You can view the total playback duration at the top right of the playlist window. Click Preview to see how the playlist will play before deploying it to a device.
-
Instant Media Upload: If the media you need is not already in your library, you can upload it without leaving the page. Click the ➐ +Upload Media button or drag and drop a file from your computer into the library area. After uploading, drag the file into the playlist window to add it to the playlist.
.jpg)
➊
➋
➍
➐
➏
➎
➌
Add an Interactive Event to a Playlist
When a specific trigger (keyboard/remote input, face recognition, proximity sensor, etc.) occurs during playlist playback, the assigned event content will play immediately.
While the event content is playing, the original playlist will be paused, and once the event ends, it will resume from the point where it was interrupted. Key use cases include:
Retail Stores (Face Recognition Trigger): A promotional video plays on a loop, and when a customer’s face is recognized, it immediately switches to a personalized welcome message or discount coupon information.
Interactive Advertising (Proximity Sensor/Touch Trigger): When a customer approaches the screen or touches a sensor, the existing advertisement pauses, and detailed product specifications or usage videos are displayed to maximize customer engagement.
-
Click ➊ Add Interactive Event to open ➋ Interactive Event List.
-
➌ Select an existing trigger from the list, or click ➍ New Trigger/Action in the upper-right corner to create a new trigger.
➊
.png)
➋
➌
➍
-
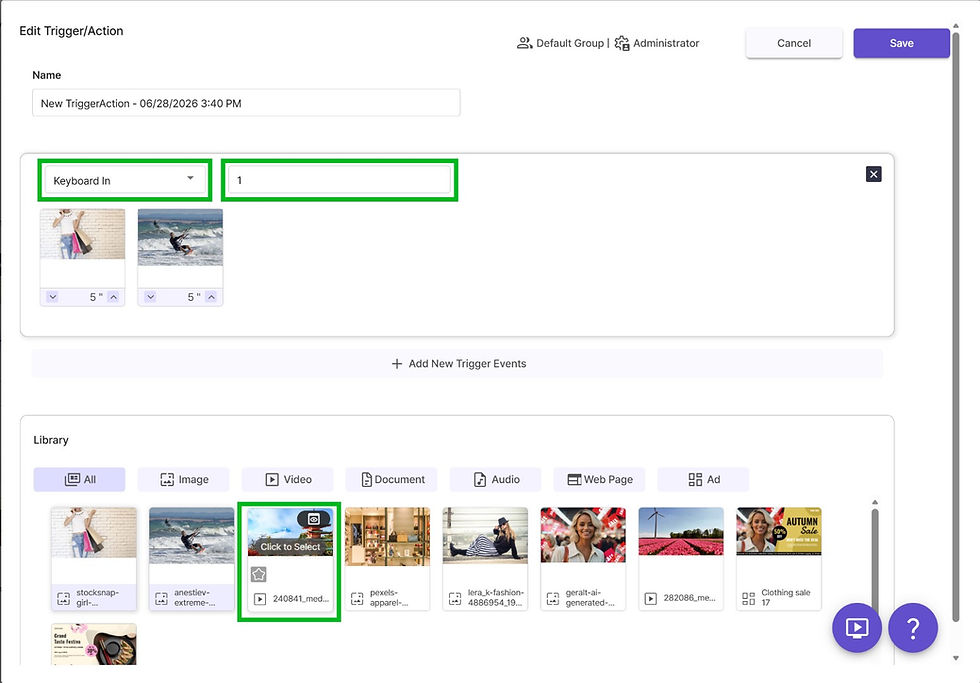
Enter a name, then click the ➎ +Add New Trigger Events button to configure the trigger settings.
.png)
➎
-
➏ Select Trigger Type: Choose a method such as Keyboard Input, Remote Control, or Facial Recognition.
-
➐ Configure Conditions and Playback Content: Configure the trigger conditions and the action to be executed (e.g., if 'Keyboard Input' is selected, play specific content when the '1' key is pressed).
-
Assign Media: Click ➑ Select button in the center of Media card in Library, or ➒ drag and drop the card directly into Trigger Event Timeline.
-
Click Save to apply the configuration.
➏
➐

➑
➒
-
Select the event to apply to the playlist from Interactive Event List.

-
➓ Interactive event has been added to Playlist Editor. To change the event, click ⓫ Change Interactive Event button to go to Event List and edit it.

⓫
➓
Once all settings are complete, click Save button at the top right to apply the changes.


Products
Use Cases