Quick Start Guide
Requirements
-
A Device
-
A Display
-
A Mounting Bracket
-
HDMI Cables (Quantity depends on the number of connected monitors)
-
Windows PC (Minimum requirements):
-
Processor: 2.3 GHz or higher
-
Memory: 4 GB RAM
-
OS: Windows 11 or 10 (32/64-bit)
-
Device Installation Options
-
Option A: TV Mounting
-
➊ Secure the mounting bracket to the device using the two provided 3mm screws.
-
➋ Insert the 8mm TV mounting bolt into the bracket and attach the locking washer.
-
➌ Thread the 8mm TV mounting bolt through the TV mounting hole and secure it with the hex nut.
-


-
Option B: Desktop Placement
-
Place the device on a flat, stable, and well-ventilated surface.
-
Cable Connections
HX5
LX5

-
Connection Order
➊ Connect ethernet (LAN) cable
➋ Connect HDMI cable
➌ Connect USB-C (DP Alt Mode) cable
➍ Connect USB mouse
➎ Connect power adapter
-
Connection Order
➊ Connect ethernet (LAN) cable
➋ Connect HDMI cable
➌ Connect USB mouse
➍ Connect USB-C power adapter
CONNECTPlayer Remote Connection Setup
📌 Note
If the CMS and devices are connected to the same network, CONNECTPlayer Remote Connection setup is not required.
In this case, please skip the CONNECTPlayer Remote Connection setup and proceed to the Device Registration section below.
Remote Connection is only required when the CMS and devices are located in different locations.

By enabling Remote Connection, you can manage multiple devices located in different places from the CONNECTPlayer CMS installed on your local PC. This setup only needs to be completed once.
-
Step 1: Install CONNECTPlayer CMS
Install and run CONNECTPlayer CMS.
-
Step 2: Open the Remote Connection Menu
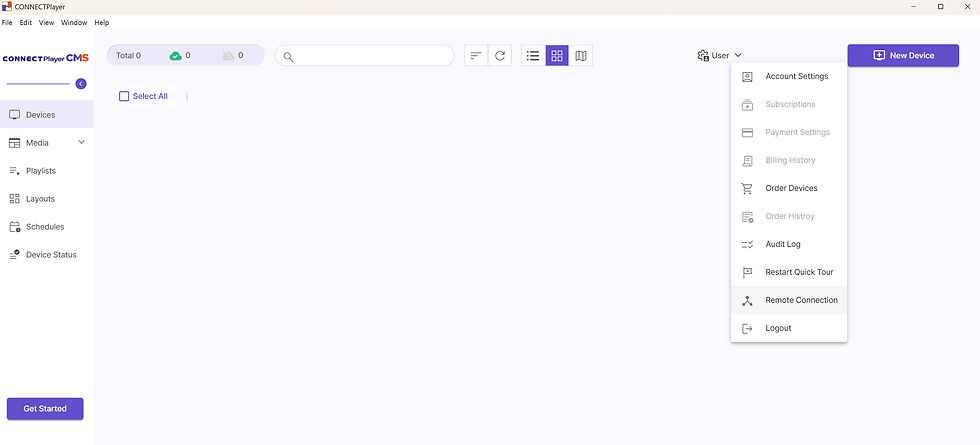
Click ➊ User in the top-right corner, then select ➋Remote Connection.
➊
➋
-
Step 3: Enter the Activation Code
Enter the ➌ Activation Code provided by your reseller.
-
Step 4: Activate Remote Connection
Click the ➍ Activate Remote Connection button. When activated for the first time, the required remote connection components may be installed automatically. On Windows, an administrator approval dialog may be displayed.
When the setup is complete, ➎ Status changes to On.

-
Step 5: Configure Port Forwarding
Configure port forwarding on your router so that remote devices can connect directly to the CMS.
Refer to the ➏ Port Forwarding section shown on the Remote Connection screen above.
📌 Values to enter on your router:
Protocol: UDP / Port: 41641 / Target IP: 192.168.XXX.XXX
※ Set the ➐ Target IP to the value displayed in the Port Forwarding section of the Remote Connection screen.
-
Open the Router Administration Page
Open your router's administration page in a web browser.
How to find the router address
-
Press Windows + R
-
Type cmd
-
Run ipconfig
-
Find the Default Gateway address
-
Open the address in a web browser
2. Add a Port Forwarding Rule
In the router administration page, locate one of the following menus (Port Forwarding / Virtual Server / Port Mapping / NAT)
Enter the protocol, port, and target IP identified in Step 5, then save the settings.
※ The menu names and screen layouts may vary depending on the router model, but the required values (UDP, 41641, and the target IP) are the same.
Registering Your Device
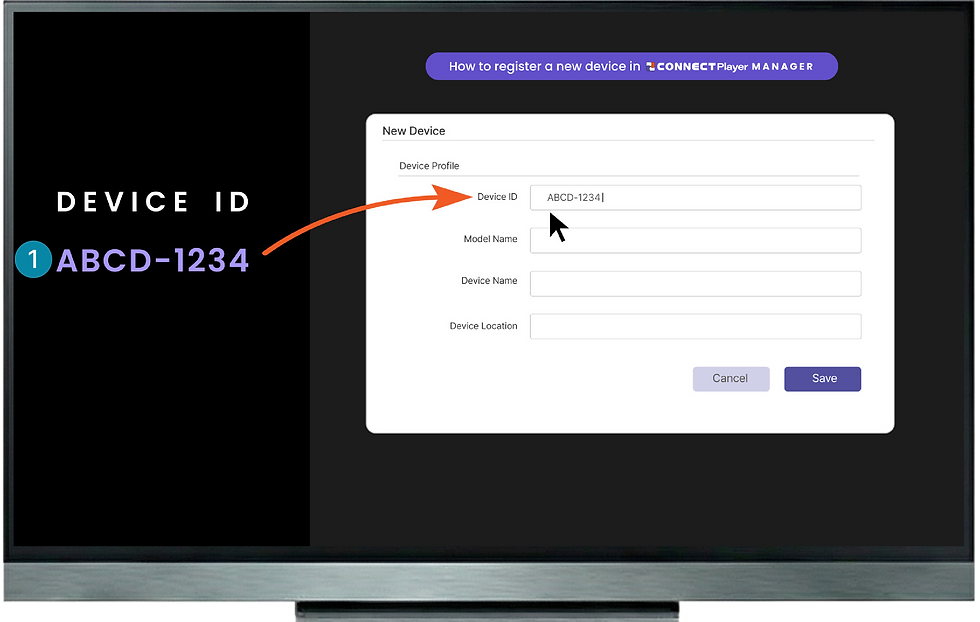
➊ Once the device has finished booting, the Device ID (e.g., ABCD-1234) will be displayed on the screen.
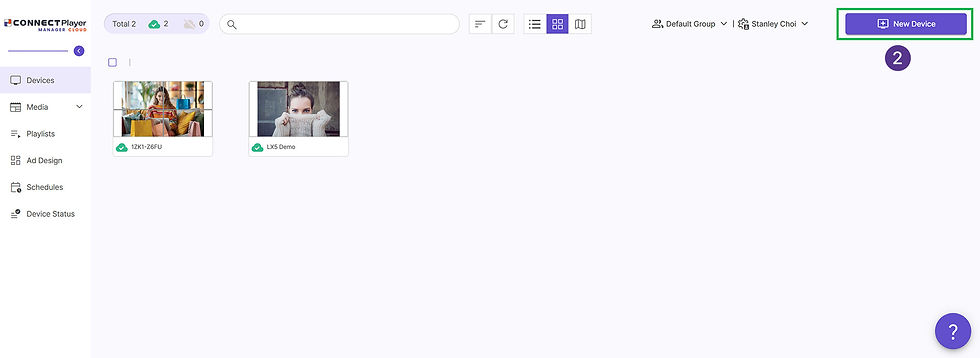
➋ On the Devices page in the CMS, click the New Device button in the upper-right corner.
➌ Enter the 8-character Device ID shown on the device screen to register the device.

Upload Media Files
➊ Navigate to Media page and click New Media to open the upload window.
➋ Drag and drop files from your computer into the upload window.
➌ Click Upload.
➍ Once the upload is complete, the media files will appear in the Media page. Click Deploy to Devices icon to open the Device Transfer window, where you can select a device to send the media to.
➎ Click Deploy to Devices. The selected device will download the content and automatically begin playback when the download is complete.


.jpg)


Products
Use Cases