Widgets
A 'functional component' of the design. It is dynamic and operates as an independent program that processes external data or executes specific functions. (e.g., Google Calendar, Live Menu Manager, real-time news, clock, etc.)
Current Weather

Display the current weather information from OpenWeather. The widget will automatically reload the data every 10 minutes.
Click Current Weather in Widget panel. The widget will be added to the canvas immediately, and Current Weather Settings will appear on the left panel.
Current Weather Settings
-
Select City
-
Use device location: When checked, it uses the location information set during the device registration stage. When unchecked, you can manually enter the desired city.
-
-
Weather Settings
-
Show temp. in: Select the units for temperature and wind speed. You can specify either Metric (°C, km/h) or US/Imperial (°F, mph) from the dropdown menu.
-
Language: Select the language for the weather information to be displayed in.
-
Use background image: When checked, a background image matching the current weather condition is automatically applied. When unchecked, a translucent background is applied.
-

Weekly Weather

Display the current weather information from OpenWeather. The widget will automatically reload the data every 10 minutes.
Click Weekly Weather in Widget panel. The widget will be added to the canvas immediately, and Weekly Weather Settings will appear on the left panel.
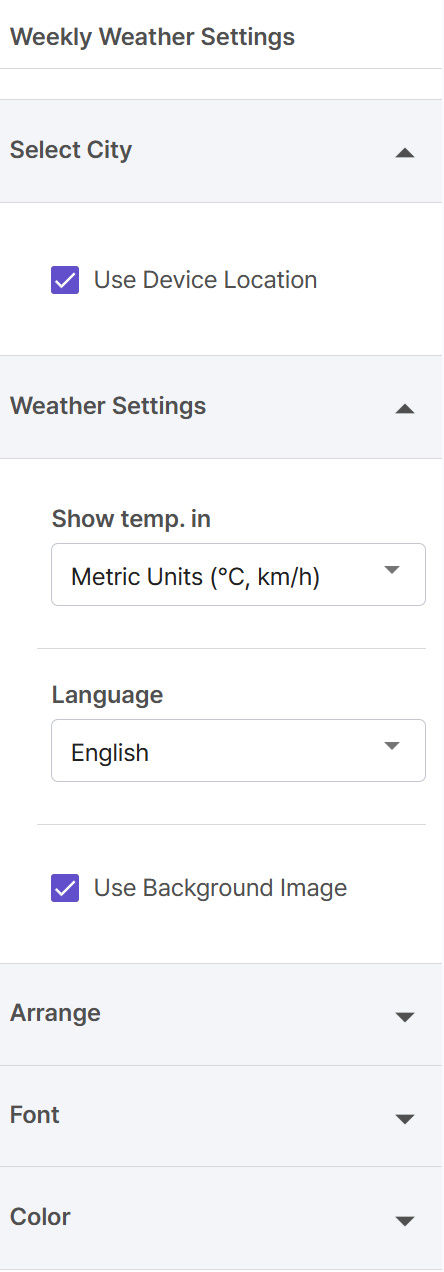
Weekly Weather Settings
-
Select City
-
Use device location: When checked, it uses the location information set during the device registration stage. When unchecked, you can manually enter the desired city.
-
-
Weather Settings
-
Show temp. in: Select the units for temperature and wind speed. You can specify either Metric (°C, km/h) or US/Imperial (°F, mph) from the dropdown menu.
-
Language: Select the language for the weather information to be displayed in.
-
Use background image: When checked, a background image matching the current weather condition is automatically applied. When unchecked, a translucent background is applied.
-

Analog Clock

You can add Analog Clock to the canvas to visually check the current time and enhance the page's atmosphere as a design element.
Click Analog Clock in Widget panel. The widget will be added to the canvas immediately, and Analog Clock Settings will appear on the left panel.

Digital Clock

You can add a ➂ Digital Clock Widget to the canvas to display the current time in a clear, numerical format.
Click the Digital Clock widget in the Widget panel. The widget will be added to the canvas immediately, and the Digital Clock properties will appear on the left panel.
Digital Clock Settings
-
Show date: When checked, the date is displayed on the widget.
-
Show seconds: When checked, the time is displayed down to the second.
-
Date format: Select the date format. You can choose your preferred format (e.g., MMM d, yyyy) from the dropdown menu.


The New York Times News

Displays news feeds from The New York Times. Use an RSS feed from the news site to display on your screens.
Click The New York Times in Widget panel. The widget will be added to the canvas immediately.

CBS Sports News

Display news feed from CBS Sports. Use an RSS feed from the news site to display on your screens.
Click CBS Sports in Widget panel. The widget will be added to the canvas immediately.

BBC News

Display news feed from BBC. Use an RSS feed from the news site to display on your screens.
Click BBC News in Widget panel. The widget will be added to the canvas immediately.

Live Orders Status

This widget displays order details at the bottom of the display in real time as customer order information is received. Information such as menu names, quantities, and options is automatically updated, helping to improve store operation efficiency.
-
Add a Widget to the Canvas
-
Select the Live Order Status widget from the widget panel.
-
The Live Order Status Board will appear at the bottom of the canvas.
-
Click the widget to open the LIve Order Status Settings panel on the left.
-
-
Live Order Status Settings: This setting is to connect the real-time order status widget to the Order Dashboard and receive real-time order data. Please enter the following items accurately for real-time data synchronization.
-
Broker Address: The address of the relay server that instantly delivers changed order data from the order dashboard to the real-time order status widget.
-
Order Dashboard URL: [https://shop-demo-office.connectplayer.net/order]
-

-
Order Dashboard Test Guide:
This is a dashboard to test and monitor whether the order status is displayed in real time on the in-store menu board (Live Order Status widget) when a customer places a coffee order through the ordering app. Prior to the official integration with the franchise-dedicated app, this verifies in advance whether real-time order data is properly received by the real-time order status widget.
-
Top Status Bar Information:
-
Connection Status: Current real-time data sync status (Check for the "Connected" display)
-
Store Name: Currently logged-in store name (e.g., long-beach-branch)
-
Menu Tabs: Menu, Order, Menu + Order, Settings
-
Language: Used language settings
-
Account Info: Logged-in administrator account and logout button
-
-
Broker Address: The top of the order creation section displays the broker address for integration with the real-time order status widget.
-
Display Example: wss://mqtt-office.connectplayer.net/store/usr_01KZ059MRKM8RMBW9GWK/0ff6075aa2a3ae5a77474c4f5527c702/orders
-
Clicking the copy icon to copy the address and entering it into the real-time order status widget settings completes real-time data synchronization between the order dashboard and the widget.
-
-
Order Creation:
-
Entering the customer's name, selecting a menu, and clicking the Add Order button immediately displays the order details on the real-time order status widget.
-
Clicking each order status (Received, In Progress, Brewed, Completed) in the bottom list immediately reflects that stage on the real-time order status widget.
-


Live Menu Manager (Real-Time Menu Management & Automatic Updates)

When you add, edit, or delete a menu in the Menu Dashboard, it is automatically reflected on the store display in real time. The latest menu information is updated in real time without the need for a separate refresh.
-
Add a Widget to the Canvas
-
Select the Live Menu Manager widget from the widget panel.
-
A default coffee shop menu board will be displayed on the canvas.
-
Click the widget to open the Live Menu Manager Settings panel on the left.
-
Live Menu Manager Setting
This setting is to connect the Live Menu Manager widget to the Menu Dashboard and receive menu data. Please enter the following items accurately for real-time data synchronization.
-
Broker Address: the address of the relay server that instantly delivers updated menu information from the Menu Dashboard to the Live Menu manager widget.
-
Menu Dashboard URL: [https://shop-demo-office.connectplayer.net/menu]

-
Menu Dashboard Guide: This is a system that allows you to manage store menu categories, individual items, and prices in real time from the Menu Dashboard.
-
Top Status Bar Information:
-
Connection Status: Current real-time data sync status (Check for the "Connected" display)
-
Store Name: Currently logged-in store name (e.g., long-beach-branch)
-
Language: Used language settings
-
Account Info: Logged-in administrator account and logout button
-
-
Broker Address: The top of menu management displays the broker address to sync with the Live Menu Manager widget.
-
Display Example: wss://mqtt-office.connectplayer.net/store/stanleychoi11@gmail.com/a44439bf85fd24355be0d87d2f5f12c1/menus
-
Clicking the copy icon to copy the address and entering it into the Live Menu Manager widget settings completes real-time data synchronization between the Menu Dashboard and the widget.
-
-
Manage Categories: An area for adding and managing new menu categories.
-
How to Add a Category:
-
Enter the category name. (e.g., Smoothie)
-
Image URL: Enter the address if a category image is available. (Optional)
-
Add Category Button: Click to add the category.
-
-
Registered Category List:
-
Displays currently registered categories (e.g., Coffee, Tea, Dessert) and the number of included menus.
-
You can change positions via drag and drop.
-
Unnecessary categories can be deleted by clicking the delete button on the right.
-
-
-
Manage Menu Items: An area for adding menu items under a selected category and setting prices.
-
How to Add a Menu Item:
-
Category: Select the category the menu belongs to from the dropdown. (e.g., Coffee)
-
Menu Name: Enter the menu name. (e.g., Cold Brew)
-
Price (₩): Enter the selling price.
-
Image URL: Enter the menu image address. (Optional)
-
Add Menu Button: Click to register the menu.
-
-
Registered Menu List:
-
The registered menu name, price (₩), and delete button are displayed in a list format at the bottom. (e.g., Americano, Cafe Latte, Cold Brew, Espresso, etc.)
-
-

Google Calendar Event
You can display events registered in Google Calendar on the screen in real-time to effectively inform visitors of important events and meeting schedules.
-
When you click the Google Calendar Event widget in the widget panel, the widget is immediately added to the canvas, and the Google Calendar Event Properties are displayed in the left panel.
Google Calendar Event Settings
Calendar Settings
-
Google Calendar ID: Enter the Calendar ID of the Google Calendar from which data will be loaded. The calendar must be set to Public.
-
Display Mode: Select how events will be displayed.
-
Current and Upcoming Events: Displays ongoing events and future scheduled events.
-
Completed events are not displayed.
-
Ongoing events appear first.
-
Future events are sorted by date and time.
-
-
Today's Events: Displays all events scheduled for today.
-
This Week's Events: Displays all events scheduled for the current week (Monday–Sunday).
-
-
Event Position: Choose which events to show and in what order using the slider.
-
Date Display: Select the date and time information to display.
-
Refresh Interval: Set how often (in minutes) calendar data is refreshed.
Note: How to find your Google Calendar ID and set the calendar to 'Public'
-
How to find the Calendar ID
-
Access Google Calendar on your PC.
-
In the 'My calendars' list on the left sidebar, click the three-dot icon (⋮) next to the calendar you want to use.
-
Click [Settings and sharing].
-
Scroll down to the 'Integrate calendar' section.
-
Locate and copy the 'Calendar ID' (an email-style string).
-
-
How to set the calendar to 'Public'
-
Navigate to the [Settings and sharing] page as described above.
-
Under the 'Access permissions for events' section, check the box for [Make available to public].
-
Click [OK] on the pop-up notification to apply the changes.
-
(Optional) You can specify the level of detail displayed on the digital signage via the 'Access permissions' setting:
-
See all event details: Event titles and details will be fully displayed on the screen.
-
See only free/busy (hide details): Event details will be hidden, and only the booking status (Busy) will be shown on the screen.
-
-

Presentation

You can display Google Slides and Microsoft PowerPoint on the screen using this widget.
When you click on Presentation in Widget panel, the widget is immediately added to the canvas, and Presentation settings appear in the left panel.
Google Slides Settings
Slides Settings
-
Presentation URL: Enter the Google Slides or Microsoft PowerPoint URL.
-
Slide Interval: Set the duration of each Slide (default is 15 seconds per slide).
-
Loop: Toggle this switch to enable or disable looping, which restarts the presentation from the first slide after the last slide ends.
Note: 1. How to publish a Google Slides presentation
-
Open Slides in a desktop web browser.
-
Click the Share button in the upper-right corner.
-
Check the General Access section.
-
Change the setting to Anyone with the link.
-
Click Copy link to copy the presentation URL.
-
Paste the copied link into the Presentation widget settings.
2. How to publish Microsoft PowerPoint
-
Open the PowerPoint in a desktop web browser.
-
Click the Share button in the upper-right corner.
-
Check the Link settings option.
-
Change the access permission to Anyone.
-
Click Copy link to copy the presentation URL.
-
Paste the copied link into the Presentation widget settings.

Trello Board

You can display Trello lists on your screen. Connect a public Trello board to display its lists as content on your screen.
When you click Trello Board in Widget panel, the widget is immediately added to the canvas, and Trello Board Settings are displayed in the left panel.
Trello Board Settings
Board Settings
-
Trello Board URL: Type your Trello Board URL address.
-
Refresh Interval (minutes): Adjust the slider to set the interval (in minutes) for automatic Trello board updates.
Note: Guide to Making Your Trello Board Public
-
Setting Board Visibility
-
Open the Trello board you wish to make public.
-
Click the [...] (three dots) icon at the top-right corner of the board to open the menu.
-
In the menu, click the item showing the current visibility (e.g., 'Visibility: Workspace').
-
In the 'Change visibility' window that appears, select [Public].
-
Read the confirmation message regarding public access, then click [Yes] or [Confirm] to finalize the settings.
-
-
Copying the Board URL for Integration
-
Once the board is set to public, locate the URL in your browser's address bar.
-
Highlight and copy the entire URL (e.g., https://trello.com/b/xxxxxx).
-
Paste the copied URL into the URL input field of the widget settings.
-

Count Down/Up

This widget displays either the time remaining until a specific date (Count Down) or the time elapsed since that date (Count Up). It is useful for highlighting marketing events, product launches, or anniversaries to increase visitor engagement.
When you click Count Down/Up in Widget panel, the widget is immediately added to the canvas, and Count Down/Up Settings appears on the left.
Count Down/Up Properties
Counter Settings
-
Target Date: Set the date and time that will serve as the reference for the counter. Click the calendar icon to select.
-
Mode:
-
Count Down: Displays the time remaining until the target date.
-
Count Up: Displays the time elapsed since the target date.
-
-
Show Seconds: When checked, the time is displayed in detail down to seconds. When unchecked, it is displayed briefly in days, hours, and minutes.

Online Slideshow

This widget displays either the time remaining until a specific date (Count Down) or the time elapsed since that date (Count Up). It is useful for highlighting marketing events, product launches, or anniversaries to increase visitor engagement.
When you click Count Down/Up in Widget panel, the widget is immediately added to the canvas, and Count Down/Up Settings appears on the left.
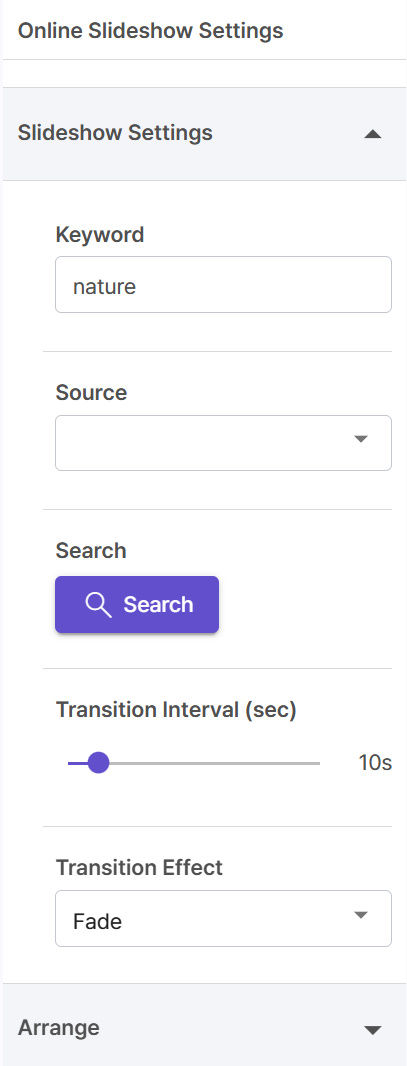
Online Slideshow Settings
Slide Settings
-
Keyword: Enter the topic of the images or videos you want to display (e.g., nature, coffee, office, etc.).
-
Source: Select the platform to fetch images and content from.
-
Unsplash: Focused on high-quality photos.
-
Giphy: Focused on dynamic GIFs.
-
-
Search: Fetches images based on the set keyword and source. When you click the Search button, an '00 images loaded' message is displayed on the right, indicating that the content is ready.
-
Transition Interval (sec): Adjusts the time interval at which slides automatically advance. (Can be set in 1-second increments using the slider.)
-
Transition Effect: Select the transition method between slides (e.g., Fade, etc., for effects during screen transitions).
WiFi Share

Generate a QR code to make it easy for customers to connect to your Wi‑Fi network.
When you click WiFi Share in Widget panel, a QR code appears on the canvas, and WiFi Share Settings is displayed on the left panel.
WiFi Share Settings : Configure the following information to allow customers to easily connect to your network via the WiFi Share widget
WiFi Settings
-
SSID: Enter the name of the WiFi network you wish to share (e.g., MyWiFi).
-
Password: Enter the password for WiFi network access.
-
Security: Select the security type of your WiFi network (e.g., WPA/WPA2, WEP, None(open)).
-
Hidden Network: Check this box if the network is hidden.

Canva Design

Display Canva designs directly on your screens without the need for downloads or uploads.
When you click Canva Design in Widget panel, the widget is immediately added to the canvas, and Canva Design Settings appears on the left.
Canva Design Settings
Smart embed link: Paste the smart embed link copied from Canva.
Note: How to get a Canva smart embed link
-
Visit this page and create a new Canva account or sign in to your existing account.
-
Create a design.
-
Click the [Share] button.
-
In the window that appears, select [See all] and then select [Embed].
-
Copy the Smart embed link and paste it into the corresponding field in the Canva properties.


Embed

You can embed any iframe-supported content and display it on your screen.
When you click Embed in Widget panel, the widget is immediately added to the canvas, and Embed Settings appears on the left.
Embed Properties
Paste your iframe code in the Embed Code field.

RSS Streamer

Displays RSS feed content as scrolling text on your screen.
When you click RSS Streame in Widget panel, it is immediately added to the canvas.
RSS Streamer Settings
RSS Feed Settings
-
RSS URL: Enter the RSS URL to fetch news feed information. (Examples:
-
ESPN General News: [https://www.espn.com/espn/rss/news]
-
NFL News: [https://www.espn.com/espn/rss/nfl/news]
-
MLB News: [https://www.espn.in/espn/rss/mlb/news])
-
-
Scrolling Direction: Sets the direction in which the text moves. You can set it to move left (<), up (^), down (v), or fix the text in place (■) without movement.
-
Scrolling Speed: Adjust the slider left or right to set the speed at which the text moves. Moving the slider to the right increases the speed of the text.


Products
Use Cases